
Scripting Docker Host Creation on DigitalOcean
This is the first post in a series about setting up and deploying Docker Swarm for production. We'll lay the foundation for future work by using a simple shell script to set up our servers on DigitalOcean.
Update - 03/04/2019: I've written an updated version of this post: Scripting Docker Host Creation on DigitalOcean without Docker Machine. Instead of using Docker Machine, it uses DigitalOcean's CLI tool, doctl, to create the Droplets.
As this ended up being a rather long post, here's a table of contents for easier navigation.
Reference Point
After exploring Kubernetes, our company chose Docker Swarm for container orchestration, primarily because of its comparitive simplicity. This, apparently, is not an uncommon decision for smaller teams, who favor Swarm (41%) over Kubernetes (31%), according to DigitalOcean's Currents report for Q2 2018.
In terms of taking Docker Swarm to production, we've found the training and resources provided by Docker Captain Bret Fisher to be very helpful. At DockerCon 2018 he presented on building a production stack for Swarm, and included in the resources a Github repository with the scripts, configuration files, etc. that he used to build out the examples. We'll be working off that codebase a lot in this and future posts.
Docker Machine
We'll be using Docker Machine to provision our Docker hosts on DigitalOcean. It is, to quote the docs:
A Docker tool which makes it really easy to create Docker hosts on your computer, on cloud providers... It creates servers, installs Docker on them, then configures the Docker client to talk to them.
This choice a matter of utility and convenience; it ships with Docker for Mac (and Windows), integrates with all major cloud providers out of the box, and is a fast practical way to get Docker machines up and running.
That being said, I should point out that Docker Machine is not the perfect tool for this. It works fine for small teams with a limited number of hosts. If you've got a larger team, you're going to need a different solution. The biggest drawback, as I understand it, is that Docker Machine configurations can't be easily shared. As a consequence, the local machine that creates the Docker hosts is the only one that can use the docker-machine commands on them. Other team members would need to SSH in to the servers directly.
The docker-machine commands we'll be using require us to set up a few things with our DigitalOcean account. Specifically, we'll need to add our SSH public key (and get its fingerprint) as well as create a personal access token for the DigitalOcean API.
Setting up a DigitalOcean Account
I'm going to be using actual remote VMs for these examples, as I've found this imparts far more practice knowledge than a local setup with VirtualBox, Hyper-V, or a single node swarm. If you'd like to follow along, you'll also need an account with DigitalOcean (You can get a $100 promo if you sign up using my referral link.)
After signing up, confirming your email, and providing your credit card information, DigitalOcean takes you to a page where you can create Droplets (VMs). We're not going to do that, because we want to handle Droplet creation programmatically.
Adding Your SSH Credentials
You'll need to upload your SSH Public Key(s) to your DigitalOcean account. Here's the DO official guide for How to Add SSH Keys to Droplets.[1]
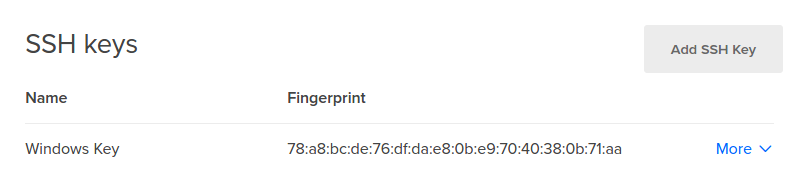
Retrieving Your SSH Fingerprint
SSH keys you've added to your DigitalOcean account are displayed in account Settings, under the Security section. There, you'll see the name you gave the SSH key and its fingerprint. We're going to need that fingerprint when setting up the docker-machine command to create the Droplets and fortunately, they make it easy to copy.[2]
Creating an API Token
DigitalOcean has a robust API for managing infrastructure. In order to script the configuration of our Droplets, we'll need to generate a personal access token for the API. Again, rather than walking you through it step-by-step, I'll point you to their official guide for How to Create a Personal Access Token. Keep in mind that it needs Read and Write permissions, because it's going to be creating Droplets.
Environment Variables
You'll need to set up a few ENV variables for this. The docker-machine script will use these when creating the Docker hosts. I'm not going to tell you how to set the environment variables because it's going to depend on your setup. The first two listed here are required, the rest are optional (and will be explained further in the next section). Here's what they need to be:
- SSH_FINGERPRINT (required) The fingerprint for the SSH public key we added to our DigitalOcean account earlier.
- DO_TOKEN (required) DigitalOcean personal access token for the API that we created.
- DO_IMAGE Publicly available distribution image to use for the Droplet.
- DO_SIZE The size of the Droplets you'd like to create.
- DO_REGION The region in which you'd like the Droplet created.
Obviously, when you're scripting the creation of VMs, you want control over the specs of the machines being created. The three optional environment variables listed above correspond to Docker Machine options that give you that control.
So what exactly are your available options for DO_SIZE, DO_IMAGE, and DO_REGION? And what are the defaults if you don't set them? Read on, and I'll break it down.
Configuring Droplets with Optional Variables
Docker Machine has a built-in driver for DigitalOcean that comes with a host of options for configuring the VMs. You'll probably find it helpful to read the docs for the Digital Ocean driver - especially if you want to customize your setup further.
When creating a Droplet through the website, choices for the image, size, and region are clearly presented and you can click to find the one you want. For example, here's the image selection:
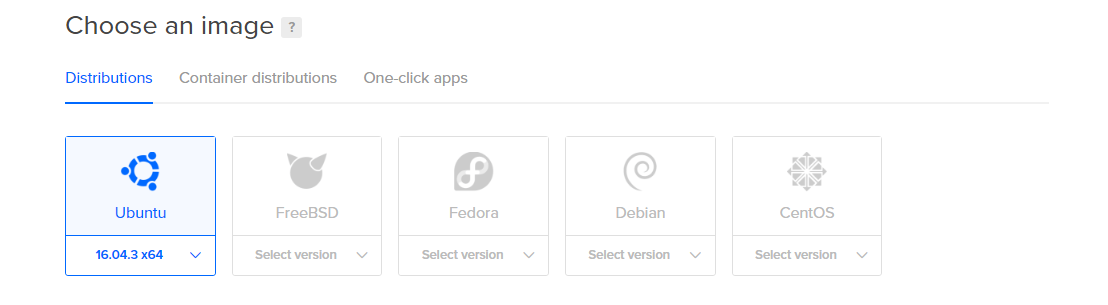
Each of these options has a corresponding slug for use from the command-line - these are the slugs used for the environment variables too. While I couldn't find an online listing of them, you can get these slugs and their descriptions via DigitalOcean's API and/or by using their offical command-line client: doctl. In both cases, you'll need the API access token created earlier. Let's take a look at how it's done.
Listing Resource Slugs with the API
This is the quickest way to get a list of slugs for available images, sizes, and regions - but the data returned isn't as easy to read as data returned via doctl. Using curl, Postman, or one of the DigitalOcean API libraries , you can make GET requests for each type of resource[3]:
- Images:
/v2/images?type=distribution - Sizes:
/v2/sizes - Regions:
/v2/regions
Here, for example, is the curl request for images:
curl -X GET -H "Content-Type: application/json" -H "Authorization: Bearer xxx-your-api-token-here-xxx" "https://api.digitalocean.com/v2/images?type=distribution&per_page=200"
You'll need to throw the resulting JSON into a formatter to actually read it and find the slug for the image you want.
Listing Resource Slugs with doctl
doctl is DigitalOcean's official command-line interface for their API. If you're going to be using DigitalOcean, it's worth taking the time to install this tool - it's powerful, easy to use, and very convenient. As you've probably gathered by now, docs are kind of DigitalOcean's thing, so again I'll defer to their instructions: How To Use Doctl. Detailed installation instructions can be found on the doctl Github repo.[4]
Once you've installed the tool and authenticated with your personal access token[5], you'll have easy access to list available resource options:
- Images:
doctl compute image list-distribution --public - Sizes:
doctl compute size list - Regions:
doctl compute region list
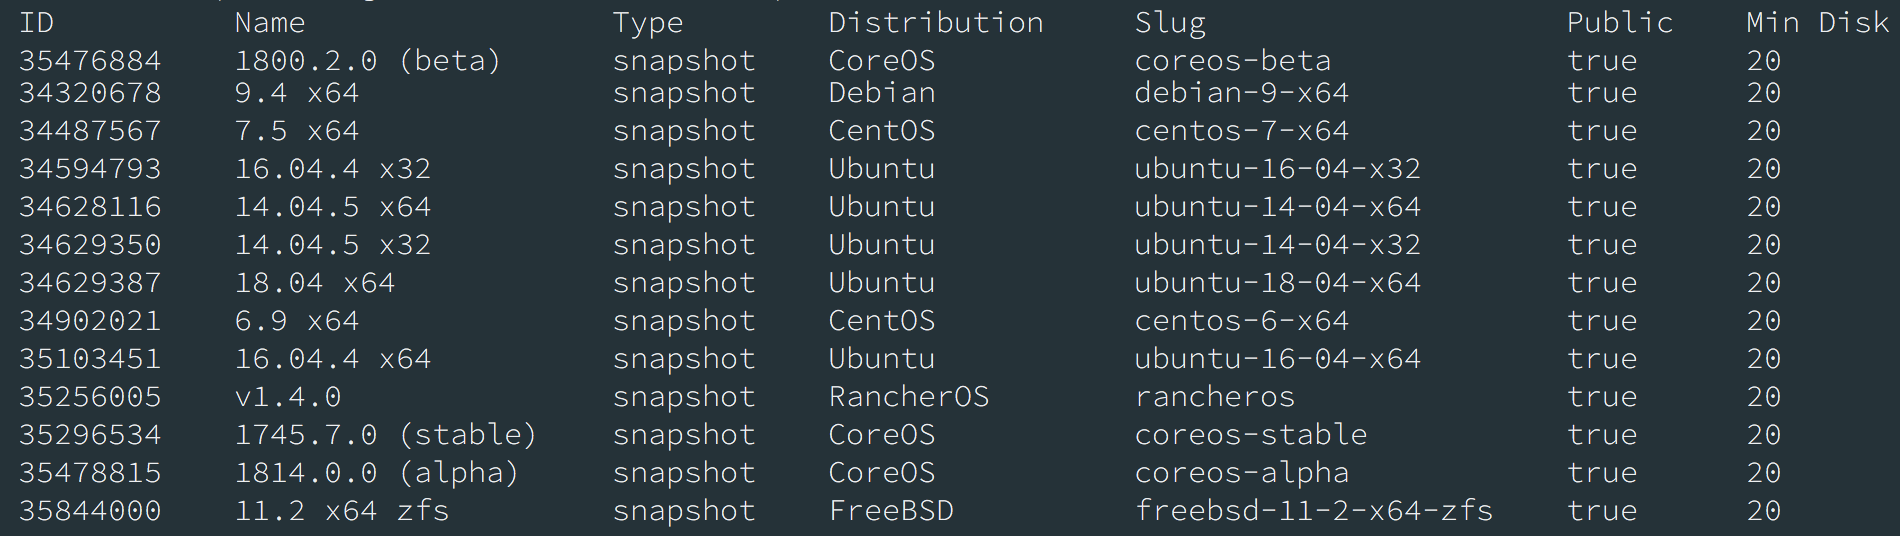
The information returned is well formatted, and locating the slug of the resource you're interested in is easy. Here's a snapshot of some of the available images:
Image, Size, and Region Defaults
DigitalOcean requires you to provide image, size, and region in order to create a Droplet. Docker Machine has defaults set for these if you don't provide them. Consequently, if you don't set the environment variables forDO_SIZE, DO_IMAGE, and DO_REGION, they fall back on the docker-machine defaults, which, at the time this is being written, are:
- Image:
ubuntu-16-04-x64 - Size:
s-1vcpu-1gb - Region:
nyc3
If you don't want those defaults, you can set the environment variables to override them, or just modify the script in the next section to match your needs.
Actually Creating the Servers
Ok, you've done all the setup work - breathe a sigh of relief - now it's time to actually create the Docker hosts. This script uses the environment variables you set to create three Droplets in your DigitalOcean account; once they're up, it installs Docker on them.
#!/bin/bash

args=(
  --driver=digitalocean
  --digitalocean-access-token="${DO_TOKEN}"
  --digitalocean-ssh-key-fingerprint="${SSH_FINGERPRINT}"
  --digitalocean-private-networking=true
  --digitalocean-tags=demotag
)
if [[ -n "${DO_SIZE}" ]]; then
    args+=( --digitalocean-size="${DO_SIZE}" )
fi
if [[ -n "${DO_IMAGE}" ]]; then
    args+=( --digitalocean-image="${DO_IMAGE}" )
fi
if [[ -n "${DO_REGION}" ]]; then
    args+=( --digitalocean-region="${DO_REGION}" )
fi

for server in {1..3}; do
docker-machine create "${args[@]}" \
  dvc${server} &
done
For convenience, here's a Gist of create-digitalocean-servers.sh that you can reference, fork, etc. The code is based on the create-servers.sh script from Bret's Docker Swarm repo.
You'll notice the script applies a example tag: --digitalocean-tags=demotag, which you can remove or modify to suit your needs. The servers created are named dvc1, dvc2, and dvc3. You can adjust the naming convention by modifying the line: dvc${server}
The process of spinning up the VMs and installing Docker can take some time, but once it's done, you'll be able to see the Droplets in your DigitalOcean account. You could also run docker-machine ls to view them locally. That's it; you scripted the creation of three Docker hosts from the command-line. Give yourself a pat on the back!
Removing the Droplets
If you want to delete the Droplets, you can also do this from the command-line, using docker-machine rm. While I was working on this post, I needed to destroy the servers several times because of errors, testing, etc. Regardless of the reason, if you want to permanently remove the Droplets, you can run the following command:
docker-machine rm dvc1 dvc2 dvc3For problematic machines, use rm -f to force the removal. Those final three params are the names of the servers that we created. If you've modified the script or changed the names of the machines, you'll need to update those to match your server names.
Conclusion
With the servers up and running, our next step will be Swarm configuration and settings. I'll begin working on that post and process now, but I'm not sure when it'll actually be posted. Every post ends up taking far longer to write than I anticipate.
I'm still new to this, so one of my aims is to keep things simple; I want a process and tooling that works and that I understand. If you know of superior approaches, I'd love to hear about them.
Footnotes
If you have issues with setting up your account or SSH keys, feel free to let me know in the comments - I'm happy to lend any help that I can. Or, just use DigitalOcean's support. ↩︎
There are also ways to retrieve existing SSH key fingerprints. For example, on my Mac, I can run
ssh-keygen -E md5 -lf ~/.ssh/id_rsa.puband the fingerprint is returned. But why go through the hassle when you've already added the key to your DigitalOcean account and they show you the fingerprint? ↩︎Add the query param
per_page=200to the end of any of these so that you don't need to page the results. ↩︎For what it's worth, as Mac user who doesn't use Homebrew, I ran
curl -sL https://github.com/digitalocean/doctl/releases/download/v1.8.3/doctl-1.8.3-darwin-10.6-amd64.tar.gz | tar -xzvto download and extract the binary, and then moved it to my path, in/usr/local/bin. ↩︎Just run
doctl auth initand enter your token when prompted. ↩︎
